第4课:基于瓦片的处理
作者: Yingchu Hu, 叶粟
时间序列数据集: Harmonized Landsat-Sentinel (HLS) 数据集
应用: 通用干扰制图,中国杭州
本教程将指导您使用 pyxccd 处理 HLS 影像数据,以生成年度干扰图、近期干扰图和首次干扰图。工作流程包含三个主要步骤。
步骤 0:准备工作
1. 安装 Pyxccd
pip install pyxccd
2. 准备 HLS 影像
HLS_root_directory/
└── Tile_ID (e.g., 51RTP)/
    └── HLS_daily_folder (e.g., HLS.S30.T51RTP.2021238T023551.v2.0)
        └── HLS_image_files (e.g., HLS.L30.T51RTP.2021238T023146.v2.0.B02.tif)
3. 配置文件
准备 config_hls.yaml 并包含可调整的块大小参数(示例使用 30×30 的块):
DATASETINFO:
  n_rows: 3660
  n_cols: 3660
  n_block_x: 30
  n_block_y: 30
步骤 1:影像预处理
目的
按时间序列堆叠 HLS 影像,以便后续进行变化检测。
流程
根据需要调整 config.yaml 中的配置
切换到目录
pyxccd\tutorials\notebooks并运行堆叠脚本:
python prepare_ard.py --source_path /path/to/HLS_root_directory/Tile_ID \
                     --yaml_path /path/to/config.yaml \
                     --out_path /path/to/stack/data \
                     --low_date_bound 2019-01-01 \
                     --upp_date_bound 2024-12-31 \
                     --n_cores 16
参数
--source_path: HLS data directory (HLS/51RTP)
--yaml_path: Configuration file path
--out_path: Output directory for stacked data
--low_date_bound: Start date (YYYY-MM-DD)
--upp_date_bound: End date (YYYY-MM-DD)
--n_cores: The total cores assigned
输出
输出目录(默认为 stack)将包含 {TileID}_stack 文件夹,其中为每个瓦片存放了按块组织的堆叠数据。
步骤 2:断点检测
SCCD 算法:
目的
使用 pyxccd 的 SCCD 算法在像元级别检测断点。
流程
完成堆叠过程(步骤 1)
运行 SCCD 检测脚本:
python tile_processing.py --method SCCDOFFLINE \
                     --stack_path /path/to/stack/data \
                     --yaml_path /path/to/config.yaml \
                     --result_path /path/to/sccd_results \
                     --low_datebound 2019-01-01 \
                     --upper_datebound 2024-12-31 \
                     --n_cores 16
参数
--stack_path: Stacked data directory from Step 1
--result_path: Output directory for SCCD results
(Other parameters same as Step 1)
输出
输出目录(默认为 sccd_results)将包含:
record_change_x{blockX}_y{blockY}_sccd.npy: Change detection results per block
SCCD_block{blockID}_finished.txt: Completion marker files
COLD 算法:
目的
使用 pyxccd 的 COLD 算法检测像元级别的变化。
流程
完成堆叠过程(步骤 1)
运行 COLD 检测脚本:
python tile_processing.py --method COLD \
                     --stack_path /path/to/stack/data \
                     --yaml_path /path/to/config.yaml \
                     --result_path /path/to/cold_results \
                     --low_datebound 2019-01-01 \
                     --upper_datebound 2024-12-31 \
                     --n_cores 16
或 S-CCD
python tile_processing.py --method SCCDOFFLINE \
                     --stack_path /path/to/stack/data \
                     --yaml_path /path/to/config.yaml \
                     --result_path /path/to/cold_results \
                     --low_datebound 2019-01-01 \
                     --upper_datebound 2024-12-31 \
                     --n_cores 16
参数
--stack_path: Stacked data directory from Step 1
--result_parent_path: Output directory for COLD results
(Other parameters same as Step 1)
输出
输出目录(默认为 cold_results)将包含:
record_change_x{blockX}_y{blockY}_cold.npy: Change detection results per block
COLD_block{blockID}_finished.txt: Completion marker files
步骤 3:干扰图生成
目的
将断点检测结果转换为年度/近期/首次干扰图。
流程
完成步骤 1-2
运行干扰制图脚本:
COLD:
python export_change_map.py --source_dir /path/to/HLS_root_directory/Tile_ID \
                               --result_path /path/to/cold_results \
                               --out_path /path/to/disturbance_maps \
                               --method COLD \
                               --yaml_path /path/to/config.yaml \
                               --year_lowbound 2019 \
                               --year_uppbound 2024 \
                               --n_cores 16
S-CCD:
python export_change_map.py --source_dir /path/to/HLS_root_directory/Tile_ID \
                               --result_path /path/to/sccd_results \
                               --out_path /path/to/disturbance_maps \
                               --method SCCDOFFLINE \
                               --yaml_path /path/to/config.yaml \
                               --year_lowbound 2019 \
                               --year_uppbound 2024 \
                               --n_cores 16
参数
--source_dir: HLS directory (for spatial reference)
--result_path: SCCD or COLD results directory
--out_path: Output directory for disturbance maps
--method: SCCDOFFLINE or COLD
--year_lowbound: Start year
--year_uppbound: End year
--n_cores: The total cores assigned
输出
输出目录(默认为 disturbance_maps)将包含:
S-CCD:
{year}_break_map_SCCDOFFLINE.tif: Annual disturbance date and type map
first_disturbance_map_SCCDOFFLINE.tif: First disturbance map (year of first disturbance)
recent_disturbance_map_SCCDOFFLINE.tif: Recent disturbance map (year of latest disturbance)
COLD:
{year}_break_map_COLD.tif: Annual disturbance date and type map
first_disturbance_map_COLD.tif: First disturbance map (year of first disturbance)
recent_disturbance_map_COLD.tif: Recent disturbance map (year of latest disturbance)
注意事项
对于大面积区域,请分批处理瓦片以避免内存过载。
调整 config_hls.yaml 中的块大小参数以平衡处理速度和内存使用。
中断的处理可以恢复——脚本将跳过已完成的块。
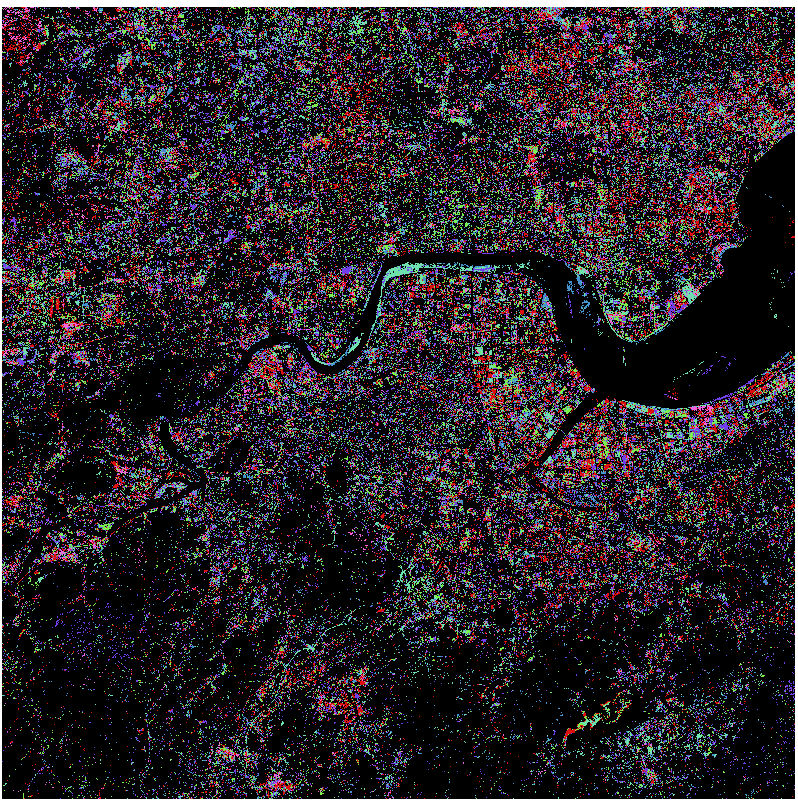
结果示例
First Disturbance Map (COLD):
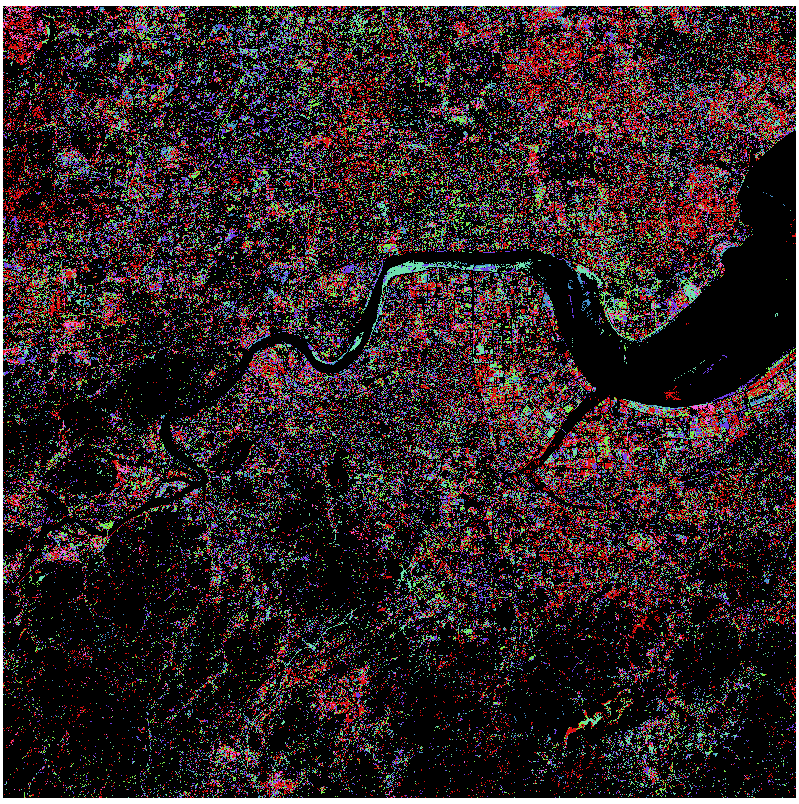
First Disturbance Map (SCCD):